Table of Contents
There’s nothing more disheartening than stepping onto your once‑pristine lawn only to find it riddled with tunnels and volcano‑shaped mounds. Those sneaky burrowers—moles—can turn your turf into an obstacle course overnight. But don’t let those little diggers win! In this expert guide, you’ll discover how to get rid of moles in your lawn once and for all. From preventive lawn care and natural repellents to targeted chemical treatments and professional options, we’ve compiled the most effective, research‑backed strategies to reclaim your green space. Ready to say goodbye to unsightly mole damage? Let’s dig in!
What Are Moles—and Why They Invade Your Lawn?
Moles are small, burrowing mammals that are often misunderstood. While they contribute to soil aeration and can help control insect populations, their tunneling habits frequently disrupt lawns and gardens.
Biology & Behavior of Moles
Moles are not rodents but insectivores with powerful digging claws and sensitive snouts. They lead mostly solitary lives except during breeding seasons. Primarily feeding on earthworms and other invertebrates, moles create extensive tunnel networks. Although controlling grub populations can sometimes help, moles may still thrive if other food sources are abundant.

Seasonal Activity and Habitat Preferences
Moles tend to be more active during the spring and fall when the soil is neither too frozen nor overly dry. However, they might burrow deeper during periods of extreme heat or cold. They favor moist, sandy loam over heavy clay soils, which allow for easier tunneling.
While moles can enhance soil aeration and naturally control certain pests, their extensive tunneling can damage plant roots, create unsightly mounds, and lead to uneven turf. Understanding their behavior is the first step in crafting an effective management strategy.
Signs You Have a Mole Problem
Detecting mole activity early can save you time and money, preventing extensive lawn damage. Here’s how to recognize the subtle—and not‑so‑subtle—clues that moles have taken up residence in your turf.
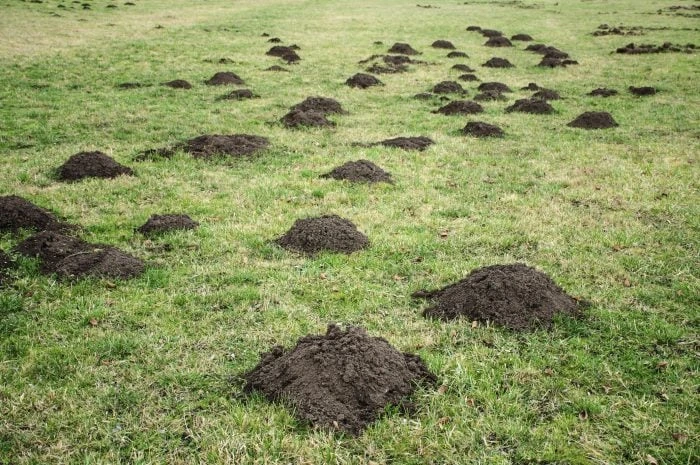
- Volcano‑Shaped Mounds:
Moles push soil upward as they dig, creating conical mounds 6–12 inches in diameter. Unlike gopher mounds, these are often perfectly round “volcanoes” with a central crater where soil was expelled. - Raised Ridges (Surface Runways):
Look for long, sinuous ridges 1–2 inches high. These are active feeding tunnels just beneath the surface. If you gently press down on a section of ridge and it springs back, the tunnel is likely in use.
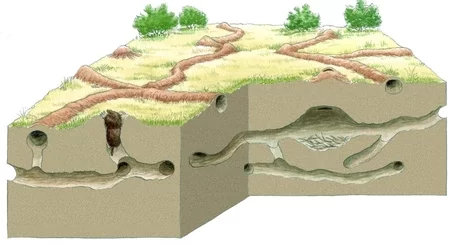
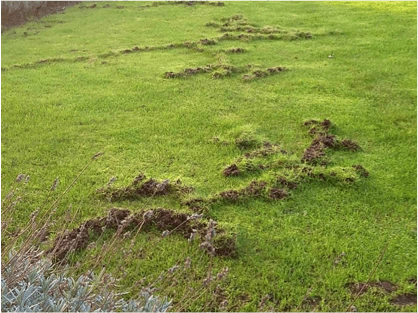
- Patchy, Spongy Turf: As tunnels collapse, the grass above can feel soft or springy underfoot. You may notice patches where the lawn dips or undulates.
- Wilting or Yellowing Grass: Mole tunnels can disrupt root systems and drainage. Sections of grass above major tunnel networks may wilt during dry spells or develop yellow “scorch” even when adequately watered.
- Loosened, Granular Soil: Freshly excavated soil is lighter and more granular than undisturbed earth. If you rake or brush aside loose soil from a molehill, you’ll see the contrast with the surrounding compacted soil.
- Unusual Drainage or Dry Spots: Because moles create networks of channels, you might notice water pooling in unexpected areas or, conversely, patches that dry out faster than the rest of the lawn.
- Rapid Re‑Emergence: Even after flattening a ridge or filling a tunnel, new mounds often appear within days if the infestation is active. Tracking how quickly new mounds form can help gauge population size.
- Seasonal Bursts: Activity often spikes in early spring (as moles feed heavily after winter) and in fall (before the ground freezes). A sudden burst of fresh mounds in these seasons is a telltale sign.
Distinguishing Moles from Other Burrowers
| Feature | Mole | Vole | Gopher |
|---|
| Mound Shape | Conical “volcano,” central crater | Flat, soil spread evenly along tunnel | Fan‑shaped, soil pushed to side |
| Mound Image | 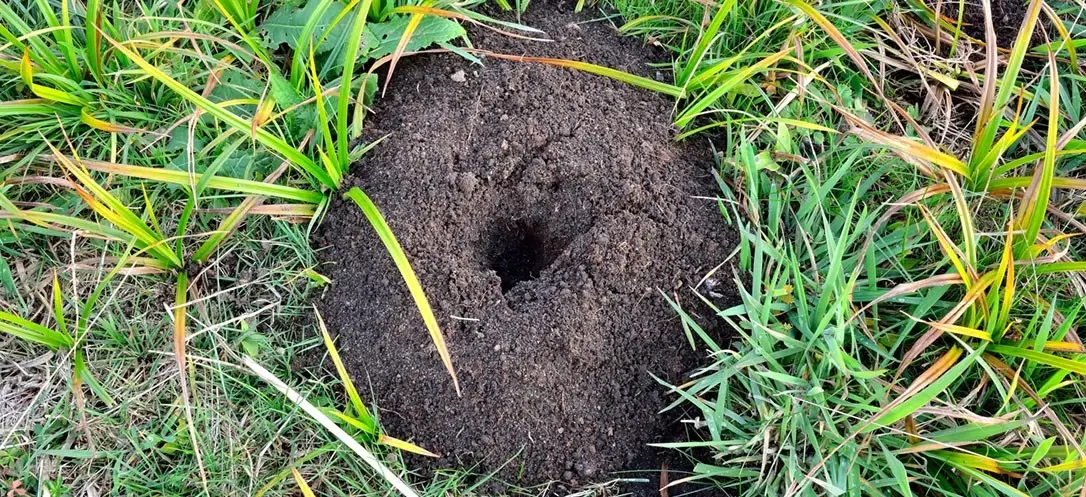 | 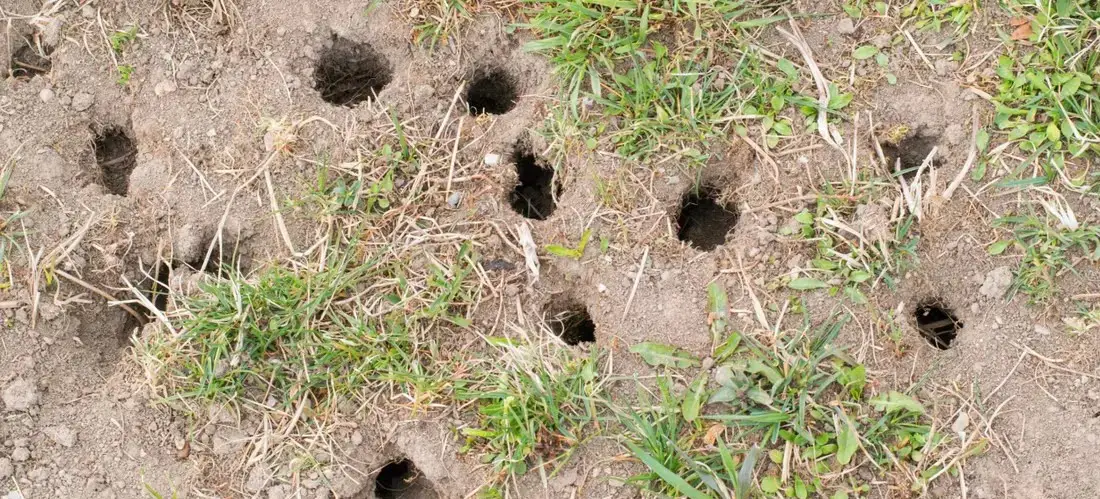 | 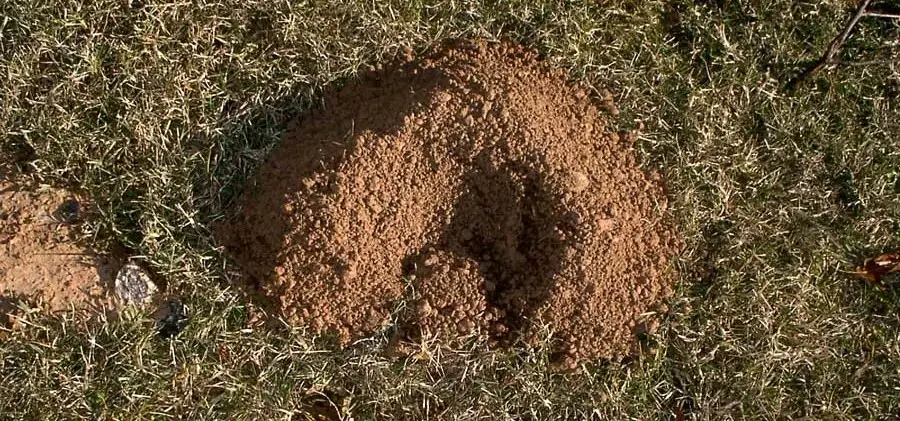 |
| Tunnel Ridges | Raised, winding ridges (1–2″ tall) | Subtle, surface‑level trails | Little to no surface ridges |
| Tunnel Depth | Shallow (1–2″) feeding tunnels | Very shallow (<1″) | Deep burrows, rarely near surface |
| Timing | Year‑round, peak spring/fall | Year‑round, but often linked to food supply | Year‑round, but more localized |
Prevention: Stopping Moles Before They Start
Prevention can reduce the likelihood of a mole infestation. While it may not completely deter moles, proper lawn care and environmental adjustments can make your yard less attractive to these burrowers.
- Aeration and Dethatching: Regularly aerate and dethatch your lawn to maintain soil health. This practice discourages excessive tunneling by improving drainage and soil structure.
- Proper Mowing: Keeping your grass at a moderate height can discourage moles by reducing cover for their tunnels.
- Improve Drainage: Moles favor moist soils. Ensuring proper drainage and avoiding overwatering can make your yard less inviting.
- Controlling Insect Populations: Although moles primarily feed on earthworms (which are beneficial for your soil), reducing populations of grubs and other insects with organic methods like beneficial nematodes can help reduce mole activity indirectly.
Natural Methods: How to Get Rid of Moles Naturally
Harnessing nature’s own tools can be an effective, eco‑friendly way to discourage moles without resorting to harsh chemicals or lethal traps. Below are five in‑depth strategies—each with step‑by‑step guidance, tips for success, and key considerations.
1. Mole control: Castor Oil–Based Repellents
Why It Works: Castor oil irritates a mole’s digestive tract and leaves an odor they find intolerable, prompting them to abandon treated areas.
DIY Spray Recipe:
- Ingredients:
- ½ cup pure castor oil
- 1 tablespoon liquid dish soap (helps oil mix with water)
- 1 gallon of water
- Mix:
- Combine castor oil and dish soap in a bucket.
- Slowly whisk in water until evenly emulsified.
- Application:
- Pour into a pump sprayer.
- Saturate active tunnels, molehills, and surrounding soil until it seeps 6–8″ deep.
- Repeat every 7–10 days, and always reapply after heavy rain.
Commercial Granular/Liquid Products:
- Granules: Broadcast at 2–3 lb per 1,000 sq ft, then water in thoroughly.
- Liquids: Follow label for spray concentration; apply with hose‑end sprayer.
- Safety Tip: Castor oil is non‑toxic to people, pets, and plants when used as directed.
2. Mole control: Other Homemade Repellents
| Ingredient | Preparation & Use | Notes |
|---|---|---|
| Garlic | Crush 4–6 cloves, steep in 1 qt hot water overnight. Strain, dilute to 1 gal, spray tunnels. | Refresh weekly; strong odor may linger. |
| Cayenne Pepper | Mix ½ cup ground cayenne in 1 gal water + 1 tsp dish soap. | Wear gloves; pepper can irritate skin. |
| Coffee Grounds | Spread fresh grounds over molehills and rake into soil. | Caffeine repels moles; also adds organic matter. |
| White Vinegar | Combine 1 part vinegar to 4 parts water; pour into runways until saturated. | Avoid repeated use near sensitive plants. |
Tip: These repellents work best as part of an integrated strategy. Rotate ingredients every 2–3 weeks to prevent moles from acclimating. Not all repellants are child- and pet-safe. Confirm a repellent or deterrent is safe to be around your family and animals before buying it.
3. Mole control: Beneficial Nematodes
What They Are:
Microscopic roundworms (e.g., Steinernema carpocapsae, Heterorhabditis bacteriophora) that parasitize soil‑dwelling larvae—reducing grub populations and indirectly starving moles.
Application Guidelines:
- Timing: Spring or fall, when soil temperatures are between 50–85 °F.
- Preparation:
- Purchase fresh, live nematodes (refrigerated).
- Mix per label instructions in non‑chlorinated water.
- Delivery:
- Apply with a watering can or hose‑end sprayer, ensuring even soil coverage.
- Water the area before and after application to move nematodes into the root zone.
- Follow‑Up: Reapply every 4–6 weeks during peak grub season for sustained control.
4. Mole control: Planting Mole‑Repellent Flora
Certain plants emit odors or compounds that moles find disagreeable. Use them as living barriers or interplant in vulnerable zones.
- Marigolds (Tagetes spp.): Contain pyrethrins—natural insect deterrents. Plant a border around flower beds or vegetable patches.
- Daffodils (Narcissus spp.): Bulbs contain lycorine, toxic to many burrowing pests. Ideal for edging walkways and garden borders.
- Eucalyptus (Eucalyptus spp.): Strong scent repels a variety of soil pests. Use young trees or shrubs as perimeter plantings.
- Alliums (Garlic, Onions, Chives): Sulfur compounds create a pungent underground barrier. Interplant in rows or clusters near mole‑prone areas.
Design Tip: Combine several repellent species in alternating rows or mixed beds to maximize deterrence.
How to Get Rid of Moles: Chemical & Commercial Solutions
When natural methods don’t give you the control you need, chemical and commercial products can deliver faster, more reliable results. Below is an in‑depth look at the most effective options, how they work, and best practices for safe application.
1. How to kill moles: Mole Repellents & Deterrents
Overview: Repellents don’t kill moles—they make your soil inhospitable so they move on. Two main active ingredients dominate the market:
- Castor Oil
- How it works: Castor oil coats tunnel walls and irritates a mole’s digestive tract, discouraging further burrowing.
- Forms & Brands:
- Granular: Victor® Mole & Gopher Repellent Granules, MoleMax™ Granular.
- Liquid Concentrate: Liquid Fence® Mole Repellent, JT Eaton® Mole Repellent Spray.
- Application:
- Water lawn lightly so soil is moist.
- Broadcast granules at roughly 2–3 lb per 1,000 ft², or mix 4 oz of concentrate per gallon of water and spray.
- Water in again to carry active ingredient into tunnels.
- Reapply every 4–6 weeks or after heavy rainfall.
- Sulfur-Based Repellents
- How it works: Sulfur’s pungent odor repels moles and other burrowers.
- Brands: Plantskydd®, MoleScram™.
- Application: Similar to castor oil granules—broadcast and water in. May require more frequent reapplication (every 3–4 weeks) due to odor dissipation.
Pro Tip: Always treat when the ground is damp but not waterlogged. Dry, cracked soil prevents repellents from penetrating active tunnels.
2. How to kill moles: Toxic Baits & Gels
Overview: Baits lure moles to feed on a poisoned “worm,” delivering a quick, targeted kill. This method is often the most effective single‑treatment solution.
- Bromethalin-Based Baits
- Products: Tomcat® Mole Killer, Talprid™.
- Mode of Action: Bromethalin is a neurotoxin; one feeding typically stops tunnel activity within 48 hours.
- Usage:
- Locate active tunnel by probing or stomping.
- Cut a small opening in the ridge.
- Place bait block directly inside; cover the opening.
- Mark location and check 24–48 hours later.
- Retreat any remaining moles with fresh bait.
- Zinc Phosphide Baits
- Products: Ortho® Mole Bait, MoleAway®.
- Mode of Action: Produces phosphine gas in the mole’s stomach, causing rapid mortality.
- Safety Note: Zinc phosphide is highly toxic to all mammals. Wear gloves, keep children and pets away, and follow label instructions meticulously.
Safety First: Always wear gloves, avoid direct contact, and never place baits where non‑target wildlife, pets, or children can access them.
3. How to kill moles: Fumigants & Gas Cartridges
Overview: Fumigants release toxic gas into tunnels. While effective, they carry higher risks and are often restricted in residential areas.
- Chloropicrin or Aluminum Phosphide Cartridges
- Procedure:
- Insert cartridge into active tunnel.
- Seal tunnel entrance with soil or turf.
- Ignite or activate per label instructions.
- Risks: Fire hazard, toxic fumes, potential liability.
- Recommendation: Generally reserved for large commercial properties or professional applicators.
- Procedure:
4. How to kill moles: Ultrasonic & Electronic Devices
Overview: These stake‑style devices claim to repel moles with vibrations or high‑frequency sound.
- Effectiveness:
- Research and field reports are mixed; many homeowners see little to no reduction in activity when used alone.
- Best results occur when devices are combined with repellents or trapping.
- Considerations:
- Power Source: Solar‑powered units eliminate battery replacements but may underperform in shaded areas.
- Coverage Area: Most cover 500–1,000 ft² per stake. Use multiple units for larger lawns.
5. Comparing Costs & Choosing the Right Product
| Method | Typical Cost | Speed of Control | Ease of Use | Safety Concerns |
|---|---|---|---|---|
| Castor Oil Repellents | $20–$40 per bag | Moderate (weeks) | Easy | Low (non‑toxic) |
| Sulfur Granules | $25–$50 per bag | Moderate | Easy | Low–Medium (odor) |
| Bromethalin Baits | $15–$30 per pack | Fast (48 hrs) | Moderate | High (toxic to mammals) |
| Zinc Phosphide Baits | $20–$35 per pack | Fast | Moderate | Very High (strict handling) |
| Fumigants | $30–$60 per pack | Fast | Difficult | Very High (fire/toxicity) |
| Ultrasonic Stakes | $20–$50 each | Variable | Very Easy | Low (harmless sound/vibration) |
Tip: For most homeowners, a two‑pronged approach—combining castor oil repellents with targeted bromethalin baiting—yields the best balance of safety, cost, and speed.
Below is the EPA status for each product, with registration or exemption details so your can verify that these are recognized under FIFRA:
| Product | EPA Status | EPA Reg. or Exempt No. |
|---|
| Victor® Dual‑Action Mole & Gopher Repellent (Woodstream) | Exempt (FIFRA 25(b)) | 36488‑25B‑5 portal.ct |
| Bonide® MoleMax™ Mole & Vole Repellent Granules | Exempt (FIFRA 25(b)) | 25B Exempt labelsds |
| Liquid Fence® Mole Repellent Concentrate | Exempt (FIFRA 25(b)) | 72041‑25B‑29 images.thdstatic |
| JT Eaton® Mole Repellent Spray | Registered (Section 3) | 45385‑97‑56 jteaton |
| Plantskydd® Repellent | Exempt (FIFRA 25(b)) | EPA Exempt plantskydd |
| MoleScram™ Professional | Exempt (FIFRA 25(b)) | EPA Exempt labelsd |
Section 3 (Registered) products like JT Eaton® carry a full EPA registration and have undergone the Agency’s review for efficacy and safety.
25(b) Exempt products use “minimum risk” ingredients (castor oil, sulfur, bloodmeal, etc.) that the EPA has deemed safe enough to exempt from full registration—though they still must meet labeling requirements.
How To Get Rid Of Moles: Trapping (The Most Effective Way)
Trapping remains one of the most reliable methods for removing moles from your lawn.
- Kill Traps (Types and Considerations): Options include scissor, choker (loop), harpoon, and plunger traps. Each type has its own set of pros and cons, and effectiveness often depends on proper placement.
- Live Traps and DIY Bucket Traps (Humane Options): Live traps or DIY bucket traps allow for the capture and relocation of moles. For a bucket trap, dig a hole in an active tunnel, insert a bucket, and cover it with a board or plywood to create a landing platform.
- Safety Tip: Always contact 811 before digging to avoid interfering with underground utilities.
- Proper Trap Placement and Monitoring:
- Where to Place Traps: Position traps along active, straight runs, especially near curbs or gutters where moles are likely to travel.
- Regular Checks: Monitor traps daily to ensure captured moles are dealt with promptly, whether by euthanasia or humane relocation according to local guidelines.
How To Get Rid Of Moles: Barriers & Physical Exclusion
- Underground Fencing: Bury hardware cloth at least 24 inches deep with an additional 12 inches above ground. This method is particularly useful for protecting high-value garden beds.
- Garden-Scale Barriers (Trench Barriers): Create a trench 2–3 feet deep and fill it with rocks or wire mesh to prevent mole intrusion.
- Bulb Cages (Protecting Individual Plants): Use wire cages around bulbs and other sensitive plants to safeguard them from tunneling activity.
Wrap‑up
Moles may be relentless, but with the right game plan, you can outsmart them and restore your lawn’s beauty. Start by fortifying your turf with proper maintenance and moisture control, then layer in natural repellents or EPA‑approved treatments as needed. For stubborn populations, precision trapping or professional assistance will tip the scales in your favor. Remember, a mole‑free lawn isn’t just about quick fixes—it’s about ongoing vigilance and a balanced approach. Armed with these expert‑tested methods, you’re well on your way to a smooth, mole‑free lawn that you—and your neighbors—will admire. Now grab your tools, choose your strategy, and let’s give those moles the boot!

